LESSON 27: The Famous Needle Trick
1. The Famous Needle Trick
First in this lesson, I give you the Famous Needle Trick. The eminent Houdini featured this wonderful effect on his vaudeville programs. He studied it detail by detail from the standpoint of SHOWMANSHIP, and in his hands it became a masterpiece. You, too, must study this effect carefully to make your presentation of it a thing which will make your audiences long remember you.
EFFECT:
From one to five packages of needles are shown. Needles are removed from packages and placed on performer's tongue. He swallows the needles and shows his mouth empty. Then magician swallows a yard or two of white cotton thread. He drinks some water to help his swallowing. Next he shows his hands empty, reaches into his mouth, and grasps an end of the thread. He pulls it slowly from his mouth, and to the amazement of all, the needles are threaded one by one on the thread.
PARAPHERNALIA:
1 -- Two packages of needles. Size 5 is suitable. You can determine by experimenting just what size you can handle best.
2 -- A spool of white cotton thread.
3 -- A glass of water.
SECRET AND PATTER:
To Prepare:
(Note: Houdini apparently swallowed FIVE packages of needles, but to begin with, I shall teach you how to work with one package. As you become more proficient, you may add more needles to the trick. If you use more needles, remember to use longer thread.)
Take the two packages of needles. File the points down on all the needles except ONE. They must be blunt so that they will not prick your mouth. Some performers use them with the regular sharp points, but this requires expert handling and is not necessary.
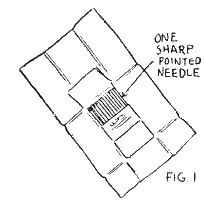
Now in one package replace the needles as they were at the beginning, putting the one sharp-pointed needle on one side. This needle is the one you pass out for examination. Be sure needles look just as they did when you bought them. Close up the package, Figure 1.
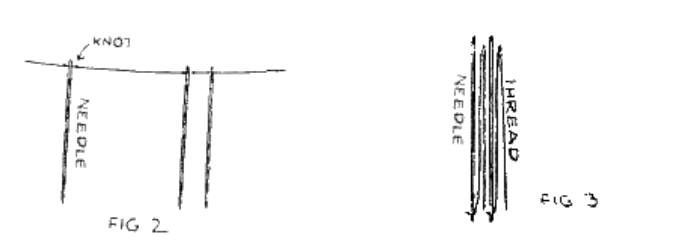
The other package of needles is threaded on about 4 or 5 feet of thread in this way: Be very careful to follow directions here. About 6 inches from one end of thread, place a needle. Tie a knot on each side of the needle so that it will not slip out of place. Thread the rest of the needles at irregular intervals along the thread, knotting each into place. Leave at least six inches free on each end of thread. Figure 2.
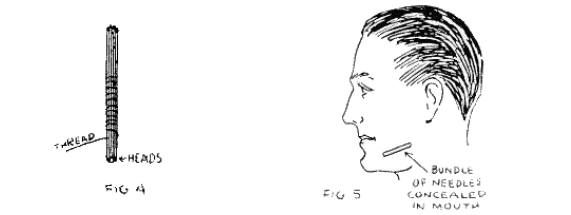
Now bunch the needles together carefully. Put the heads together, then fold the thread back and forth in zigzag fashion so that it will not tangle. Figure 3. After the last needle is in place, wrap the remaining thread around the bundle and pull about an inch of the end through the middle of the needles. This will keep the thread in place and will furnish an end for you to grasp when the time comes, Figure 4.
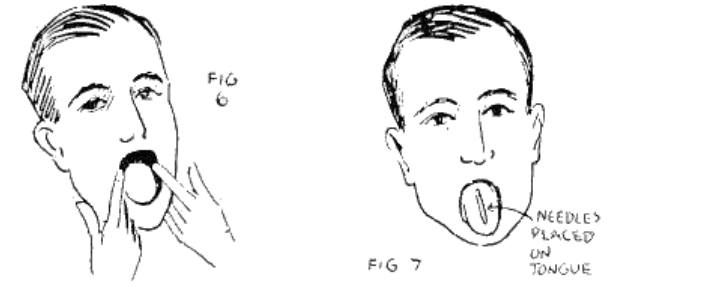
When ready to perform, place the roll of threaded needles in your mouth between your cheek and the base of your gums on the left side of the lower jaw. Heads of needles should point to the front. Package should be well pressed down into jaw. If needles have been properly prepared, you should feel no discomfort from them.
You will also find it easy to talk. Some performers carry the needles so arranged in their mouths for many minutes, so that they do not arouse suspicion just before they perform, Figure 5.
To Perform:
Come forward with package of needles and spool of white thread.
"Ladies and gentlemen: One of the puzzling features of Oriental Magic is the Famous Needle Mystery. Because of the difficulty in handling needles and the conditions under which the experiment is performed, it truly deserves its place amongst the so-called East Indian Miracles." Open package of needles and show it.
"I shall first ask someone to see that this is a package of needles."
Go down to audience. Remove the pointed needle from the package and hand it to spectator to feel.
"Just by feeling the point, needles (needless) to say, you soon discover that needles are needles."
Keep rest of needles in package, but show them freely. Allow spectator to retain the pointed needle. Now, say to another spectator:
"Sir, will you please take this package of needles and help me for a little while?" Give him the package of needles and assist him up to the stage.
NOTE:
It is not necessary to go into audience to show needles if it is not practical to do so on certain occasions. Instead, have two spectators come up to assist you. Give the sharp needle to one, and the package of needles to the other. Have one stand at your right and the other at your left so that the sharp needle cannot be replaced in package by spectators. Should, by any chance, the needle happen to be replaced, just remove the rest of the needles, leaving that one in the package. This will not be noticed by spectators. Also give spool of thread to spectator holding the sharp needle.
"I shall also ask you to hold this thread."
Give spool of thread to spectator who is on stage assisting you. Have assistant at your right.
Have your table with glass of water on it a little in front of you and to your left.
"You, sir, are to act as chief inspector. First, I want to convince you that my mouth is empty."
Open mouth and show all parts. Push lips away from upper and lower gums in front to show there is nothing concealed there. Show space between upper teeth and cheek on each side. Now apparently show spaces between lower jaw and cheek on each side. To do this reach forefingers into each side of mouth and cover bundle of needles with left forefinger. You must do this rather slowly and carefully to convince audience that there is NOTHING in your mouth. Some performers shift needles from lower to upper jaw and back again, but this requires long practice and great care. This other method will prove entirely satisfactory.
Figure 6 shows fingers being inserted into mouth to show it empty.
"Nothing there. Will you please give me the needles?"
Remove needles from package. Be sure to keep them in plain sight all the time until you get them into your mouth. Show the needles to audience, bunch them up together and hold them between thumb and forefinger of right hand. Show to audience again, holding palm of hand toward audience.
Open your mouth and stick out your tongue. Place this bundle of needles on your tongue, heads toward the rear. Move your head around so that all can see needles on tongue. Show to assistant also, Figure 7.
Now close mouth and with the tongue force the needles over into the space between cheek and lower jaw on right side, opposite to side where prepared needles are concealed.
Pretend to swallow needles. Making a swallowing motion to create the illusion of swallowing the needles. After this maneuver, sigh and say:
"Not so bad at that. Now for the thread."
Break off about the same length of thread as the one on which you have the needles threaded. Roll up about 12 inches of it into a ball and place in your mouth. Then gradually draw thread into mouth with chewing motion. Be sure not to have hands come near mouth during needle swallowing or eating of thread, Figure 8.

It is easy to get thread into a small wad in your mouth and to force it over on right side with the unthreaded needles. Figure 9 shows positions of bundles of needles—prepared ones are on the left side, unprepared ones and wad of thread on the right.
NOTE: When working with more than one package of needles for swallowing, each package is apparently swallowed one at a time. In reality, each bundle is pushed over to lower right side of mouth between jaw and cheek and stacked together there. It takes skill to work with several packages, so do not attempt it until you have mastered working with the pretended swallowing of one. "Rather a light dessert for a needle meal." Pick up the glass of water and drink some of it.
"That is sure to wash the thread down."
WARNING:
Do not throw your head back, for there is danger of your actually swallowing some needles. Some performers do throw their heads back in pretending to swallow the needles, but it is unwise for you to do so. You can get the same effect by leaning your head forward. Get the needles into position and then straighten your head. It will appear that you did lean your
Go through movements again of showing mouth empty, hiding both bundles of needles with forefingers. Do this rather hurriedly.
"I am going to ask, sir, that you help me now and be very careful in doing so. What I intend to do is to cause the needles to thread themselves on the thread while in the stomach, and then I shall pull up the thread with the needles strung on it. I shall ask you to take the thread and pull it slowly. Do not jerk. A slight jerk and I might injure my throat. So be careful."
Now make facial motions as though forcing something up your throat. Do not exaggerate these motions.
Show hands empty, fingers wide apart. With first finger and thumb of right hand reach into mouth. Push needles up from left side of mouth onto your tongue. Grasp end of thread and allow bundle of needles to unroll on tongue.
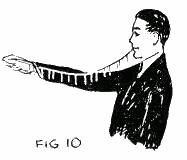
Slowly pull thread out. When about eighteen inches of thread has appeared, have spectator take hold of thread. This leaves your right hand to assist in getting needles out of mouth. When you come to end of string, grasp it in your mouth. Take other end from spectator again and hold in right hand. Hold string of needles straight out with your coat sleeve as a background to show them up better, Figure 10.
Your effect is now completed, and you may place thread and needles aside.
A THIMBLE ACT
Thimbles may have been designed for sewing purposes, but the manipulative magician has found them very effective in sleight of hand. Every kind from the simple aluminum or silver thimbles to the brightlycolored metal or wooden ones are used. Cardini, the noted English magician, uses beautiful rhinestone thimbles.
Work with thimbles is flashy and permits of beautiful moves as they appear and disappear. They reflect the light and thus are very effective.
As in other branches of manipulation you have the three fundamentals in thimble work:
1 - Production, or appearance.
2 - Vanishing, or disappearance.
3 - Transformation, or changing.
In this lesson I give you a series of moves in such continuous action as to make a pleasing thimble act or combination. You learn to work from a single thimble manipulation to a great production for the climax.
EFFECT:
Performer reaches out into the air and causes a thimble to appear at the tip of his first finger. This is placed in the left hand. Suddenly it disappears—then he finds it at his right elbow. It is thrown upwards and disappears in thin air, reappearing on the tip of the second finger of his right hand. Again magician throws the thimble high into the air and again it is gone—but in a moment it is back on the tip of his first finger. Next, in a most mysterious manner, the thimble becomes red and then changes back to its normal color again. Thimble continues to appear and disappear in bewildering fashion.
It jumps from the first finger of one hand to the first finger of the other hand. Then the spectators gasp in amazement as the magician reaches into the air and a thimble appears on each finger of his right hand, then on each finger of his left hand. He drops the thimbles in a glass on the table. He reaches into the air again and this time four thimbles appear on the fingertips of his right hand, and four on his left hand.
PARAPHERNALIA:
1 -- Sixteen thimbles. Be sure that these fit your different fingers and will not fly off when your hand is in motion. It is well sometimes to file grooves on the inside to give you a good grip. The thimbles may all be the same size except those used for the little fingers. These must be smaller to fit tight.
2 -- A special thimble painted bright red and large enough to fit OVER one of the other thimbles. It is easy to paint an ordinary thimble with bright red lacquer. It dries quickly and will prove satisfactory.
3 -- Special thimble holders. To be made from cardboard and black elastic tape. 4 -- A glass tumbler on a small table.
SECRET AND PATTER:
To Prepare:
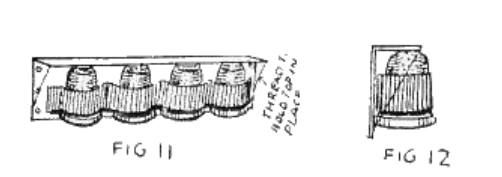
Special Thimble Holder: Take a strip of cardboard long enough to cover four thimbles and wide enough to be bent over the top of the thimbles. Sew four pockets of black elastic tape to hold the thimbles. These must be large enough to allow inserting of thimbles easily and tight enough to hold them securely until needed. Sew a thread from the bottom of the cardboard to the edge of the top to hold top down in place. The purpose of this top is to keep thimbles from pushing out when fingers are inserted. Figure 11 shows front of holder. Figure 12 shows side view of end.
Brass or other metal may be used for this holder. Holes must then be punched in the metal through which to sew the elastic.
Sometimes the holder is omitted entirely and elastic tape is sewn to form pockets for thimbles on under side of vest and coat.
Sew a special holder under left side of vest. Have front end of holder about four inches from front edge of vest and about half an inch above lower edge of vest.
Arrange all holders with openings of thimbles down so that fingers can be inserted in thimbles by curling them under edge of vest or coat.
Under right edge of vest place another holder or sew black elastic tape to vest with pockets for three thimbles. The space between the two end thimbles should be about 2-1/4 inches. A small thimble for little finger should be inserted in right end of this holder and a regular size thimble in the forward pocket.
At left front edge of vest between second and third buttonholes, sew a small pocket to hold a thimble on the under side. You may use an elastic pocket here also. Insert a thimble with open end toward edge of vest so that it can be removed when finger is inserted.
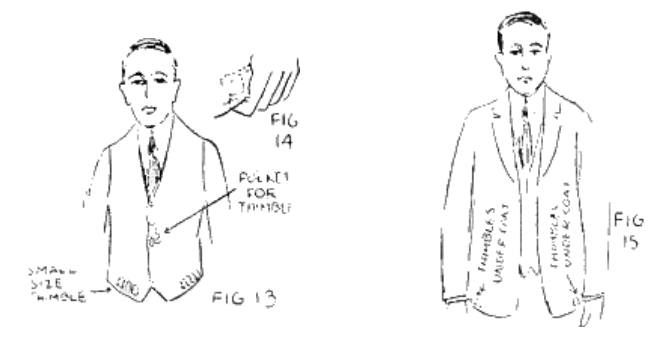
Figure 13 shows the arrangement of thimbles which you have now under your vest. One thimble in a little pocket under the left edge between second and third buttonholes. Three thimbles in a holder under the right lower edge--a small size thimble on the right end of holder. Four thimbles in a holder under left lower edge.
Figure 14 shows position of thimbles and holders under vest.
Under left edge of your coat sew a thimble holder to accommodate five thimbles. Place this about four inches from front edge and about 3/4 of an inch up from lower edge of coat. At rear end of holder insert RED thimble, then small thimble, then three regular thimbles.
Place holder in such position that when arm drops naturally to side, left fingers can curl up under coat and remove thimbles easily on finger-tips.
Have a special holder for four thimbles in similar position on right side under edge of coat.
Figure 15 shows arrangement of thimbles and holders under coat. A holder with five thimbles under left edge—a holder with four thimbles under right edge.
PRELIMINARY SPECIAL PRACTICE WITH THIMBLES:
You must get each move in Thimble Manipulation as nearly perfect as possible. Use your mirror in practicing and work at it earnestly.
There are certain Basic Moves and Principles which you must master before you can begin to think of a thimble act. These are all numbered for you through the lesson. You must practice the first four before you study the actual performance of the whole act.
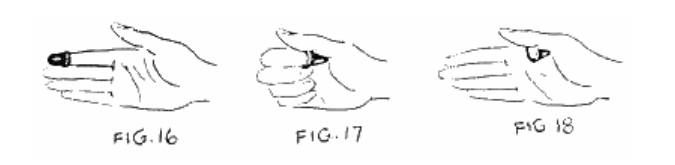
1 - Thumb Palming a Thimble:
You must be able to bring a thimble placed on the tip of first finger easily and quickly to crotch of thumb.
Study Figures 16, 17, 18 carefully (see next page). Notice how first finger brings thimble back to crotch of thumb where thimble is gripped, allowing first finger to be released and to return to first position.
When thimble is properly Thumb Palmed, it is NOT VISIBLE to audience when back of hand is toward them.
Practice getting the thimble back on the finger-tip again quickly. Practice this Basic Move with the thimble on the tips of the first three fingers.
PRACTICE ALL THESE BASIC MOVES WITH BOTH HANDS.
2 - Back and Front Hand Palming With Thimble:
This enables you to show both back and front of hand empty and yet have a thimble in your hand.
This move is to bring thimble quickly from Thumb Palm position to back of hand and then back into crotch of thumb again.
Thimble is held Thumb Palmed as in Figure 19. Bring all fingers back and grip thimble between first and third fingers. Tip of second finger is in front of opening of thimble. Release thimble from thumb and lift it up in fingers. Second finger goes under opening of thimble and first and third fingers grip edges. Your fingers pivot the thimble slightly to bring it into this position resting flat on second finger, Figure 20.
Extend fingers and thimble is brought to rear of hand, resting on second finger and gripped between first and third fingers, Figure 21.
Now close fingers into palm of hand again and bring thimble back into Thumb Palm position.
DO NOT READ FURTHER UNTIL YOU HAVE THESE MOVES MASTERED.
If you are going to do thimble work, you must realize the importance of mastering the moves in getting a thimble quickly from the finger-tip to Thumb Palm position, then back to the finger-tip—and also in getting the thimble from Thumb Palm to back of hand and again to Thumb Palm position.
In using Back and Front Hand Palming to conceal a thimble, it is absolutely necessary to study carefully

ANGLES OF VISIBILITY and NATURAL COVERING of hand in its motion to screen thimble.
Place thimble on back of hand as in Figure 22. Palm of hand is held toward audience so that thimble is not visible, Figure 23.
Bring thumb outward and downward, rotating hand with thumb as you do this. Close fingers a little, Figure 24.
Bring thumb up behind hand and close fingers more, so that you can readily Thumb Palm thimble. Insert second finger in thimble to help you get it into crotch of thumb, Figure 25. Open fingers straight out, Figure 26.
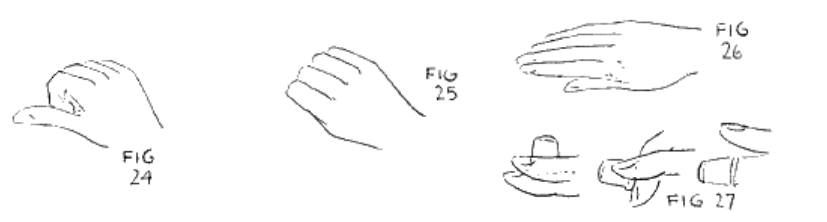
Figure 27 is a detailed diagram showing each motion in accomplishing the preceding manipulation. First, the thimble is grasped between first and third fingers and rests on back of second finger. As fingers curve downward toward thumb, the thimble is pivoted and rotates downward until it is finally inserted on tip of second finger. Then it is thrust into Thumb Palm position. This diagram is a side view.
Figures 28, 29, 30, 31 show the movements from the rear away from the audience. Study these illustrations closely until you understand them perfectly and can perform the moves without hesitation.

Now with thimble Thumb Palmed you can show back of hand empty—and you have shown both sides of your hand apparently empty.
To get thimble from Thumb Palm to Back of Hand again, just reverse the movements.
3 - Production of Thimble:
Have thimble on back of hand gripped by first and third fingers. Pull second finger-tip downward and backward, causing the thimble to revolve into position shown in Figure 32. It is now easy to insert tip of second finger into opening of thimble. Thimble is held tightly between first and third fingers so that it can be pressed down well on second finger, Figure 33.
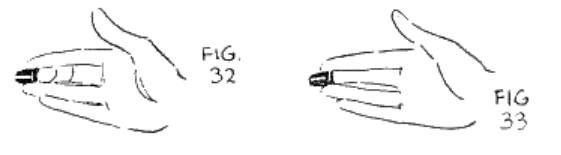
OPEN FINGERS SLIGHTLY when thimble is adjusted to make a "clean" production.
To facilitate the movement and to cover it slightly, I lower my hand about 12 inches while getting thimble on fingertip. Then I raise hand again and show thimble on finger-tip.
Sometimes I vary the production, however, by holding hand as still as possible and get the thimble suddenly on to the finger-tip..
This SHOWMANSHIP used in varying manipulations is something which you must acquire by experience. It is necessary for successful presentation and gives finish to a performance.
4 - Change-Over Palm:
This manipulation enables you to show both hands empty and yet have thimble concealed. The thimble is changed over from one hand to the other.
To start with, thimble is Thumb Palmed in right hand, Figure 34.
Look at left hand and bring it toward your right hand until two hands meet in front, backs toward audience. Slip left hand inside palm of right and slip tip of second finger of left hand into thimble, Figure 35.

Immediately Thumb Palm thimble in left hand by curling second finger down to crotch of thumb and leaving thimble there, Figure 36.
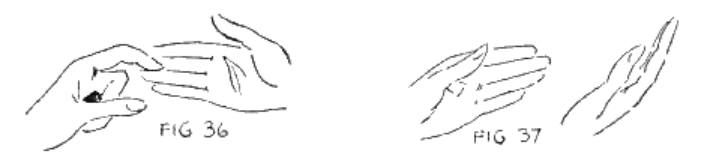
Continue moving both hands to the right, showing back of left hand and palm of right with fingers apart, Figure 37.
Figures 38, 39, 40 show position of hands in relation to your body while you perform the Change-Over. First, your right hand with the thimble Thumb Palmed is in front of you. Your left hand is out at your left side with palm shown empty to audience, Figure 38.

Bring left hand over to right in front of you. Slip thimble onto second finger and Thumb Palm thimble in left hand, Figure 39.
Continue moving hands to right, keeping back of left hand now to audience and exposing palm of right hand, Figure 40.
You have now shown both sides of both hands to audience with nothing in them. The Change-Over must be done in one continuous movement with no hesitation so that audience will not suspect anything. Practice Changing-Over the thimble from right to left and from left to right hand.
To Perform:
You are now ready to study the actual performing of your THIMBLE ACT. At the end of this section of the lesson I give you an outline of the whole act. You can then get a mental picture of the whole presentation as your audience sees it and will not be confused by all the moves and manipulations you learn here. Study each move carefully as you go along, and when you have them mastered, the organization and presentation of the whole act will be clear to you.
Turn right side a little toward audience. Reach up into air with left hand as though to catch something. Close hand and then open it again to show nothing in it. This is your MISDIRECTION for getting thimble into right hand.
Follow your left hand with your eyes and audience will do the same thing. Then at the same time curl right fingers under lower right edge of vest. Insert forefinger in middle thimble, remove thimble, and Thumb Palm it. Back of right hand is toward audience and attention is MISDIRECTED by left hand, so you will have no difficulty in doing this without being noticed.
Reach into air now with right hand and bring thimble on to tip of forefinger. You have apparently caught a thimble out of the air. Show it by turning hand back and front.
5 - Slow Thimble Vanish in Hand:
This is so named because of the slow, easy way in which a thimble vanishes when placed in the palm of one hand.
Thimble is on tip of right forefinger. Hold palm of left hand facing audience. Place right forefinger against left palm, Figure 41.
Close left hand around right forefinger, Figure 42.
Remove right forefinger, leaving thimble in left hand, Figure 43.
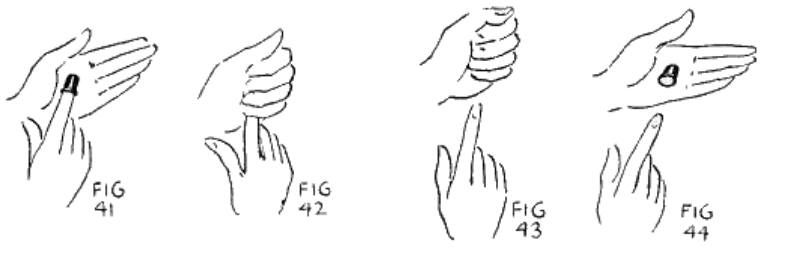
Then open left hand and show thimble in it, Figure 44.
This is all done in plain sight of audience.
Place thimble on right forefinger again and place it against left palm as you did before. Close left hand over it again, but do not grasp it tightly. Bring right forefinger into a nearly horizontal position. Remove it with thimble still on it from left hand and Thumb Palm thimble quickly in right hand, Figure 45.

Immediately bring right forefinger into position shown in Figure 46.
End of right forefinger is away from audience when you withdraw thimble and Thumb Palm it. This move will not be seen by spectators, therefore. To them it will appear that you merely withdrew finger from left hand without the thimble.
Open left hand slowly and audience sees that thimble has vanished, Figure 47.

To help conceal the thimble in Thumb Palming it in right hand, rotate right hand a little toward audience when removing finger from left hand and then raise hand upward a little while Thumb Palming.
Bạn đang đọc truyện trên: TruyenTop.Vip